
“The King of Cakes”…”Older Butweiser”
For Birthdays, Super Bowl parties, or beer lovers this beer mug cake is sure to be a crowd pleaser! (The Super Bowl is now only a few days away, this would be perfect to take to a potluck, and would be the talk of the party for sure!)
This is one of the most extravagant cakes I have made to date and once I figured out to construct it, it actually wasn’t too bad assembling and decorating. I’d LOVE to hear what you guys think of this and if you’d try it out yourself.
Pictured below is everything you will need to create this cake along with some helpful hints! 🙂

- Your favourite cake mix and icing (any kind will work!) I went for white cake and white icing so I could easily dye the icing.
- You’ll be making four 6″ round cakes (I made 2 extra just to be safe)
- 1 or 2 small baking tins (the container of icing is shown inside to depict the size). You can go bigger if you’d like but I found this to be the perfect size. This is Wilton brands smallest tin (I picked this up from Michaels $12.00 but got 40% off with a coupon!)
- White fondant (I bought this thinking I might need it for the handle but I actually went with rice krispies covered in the same colour icing as the mug.) Either will work it’s all personal preference.
-
- Spatula to spread your icing
- Large tray of your choice
- Candy melts
- Balloon holder (long plastic yellow stick in picture) I got a pack of these for $1.00 from Dollarama
- Flower wire (I picked up a pack of these from Michaels for $4.00 and used three of them inside of the balloon holder)
- I used the top of the balloon holder and put it upside down and put some candy melts on the bottom to stick it to my tray
- Fool colouring “gels” It’s perfectly fine to use your everyday liquid food colouring but I bake a lot and this pack by Wilton I got on sale at Michaels and has a ton of colours! Again I used a 40% off coupon so I got the whole pack for around $12.00. You only need to use a little bit and they will last a really long time. The colours are great and it helps in not throwing off the consistency of your icing, etc.
- Piping bag with Wilton large round tip
- Buttercream icing (I used store-bought Wilton brand but you could make your own)

Steps:
- Bake your four 6″ round cakes and LET COOL COMPLETELY!
- Use a serrated knife so that your cakes are even when stacking
- Lay the first layer on a plate. Add a small amount of frosting at the top just enough to go almost to the edges (don’t add too much or it will spew over the sides!)
- Add your second and third layers (don’t forget to frost the top of each layer!)
- I didn’t cut the top off my last layer as I knew I was going to be adding a lot of white icing to add the effect of foam so it helps if it’s already rounded!
- Next I tinted my frosting. I had two different bowls of icing one for the beer mug and poured beer and I kept the other plain white for the foam. I used the “golden yellow” colour from my package of Wilton gel colours (I wish it would have turned out a little darker, next time I will mix it with other colours!) Just remember when mixing your colours to only add a little bit at a time and to mix all your icing at once so that the colour is consistent (it’s really hard to get the same colour twice when mixing more than one colour)
- You can now use this colour to frost your entire cake! I used a Wilton spatula to help make it as smooth as possible but don’t worry to much about it being perfect! I didn’t frost the top of the cake with this colour as I knew I was going to be adding a lot of white foam bubbles with the white icing!
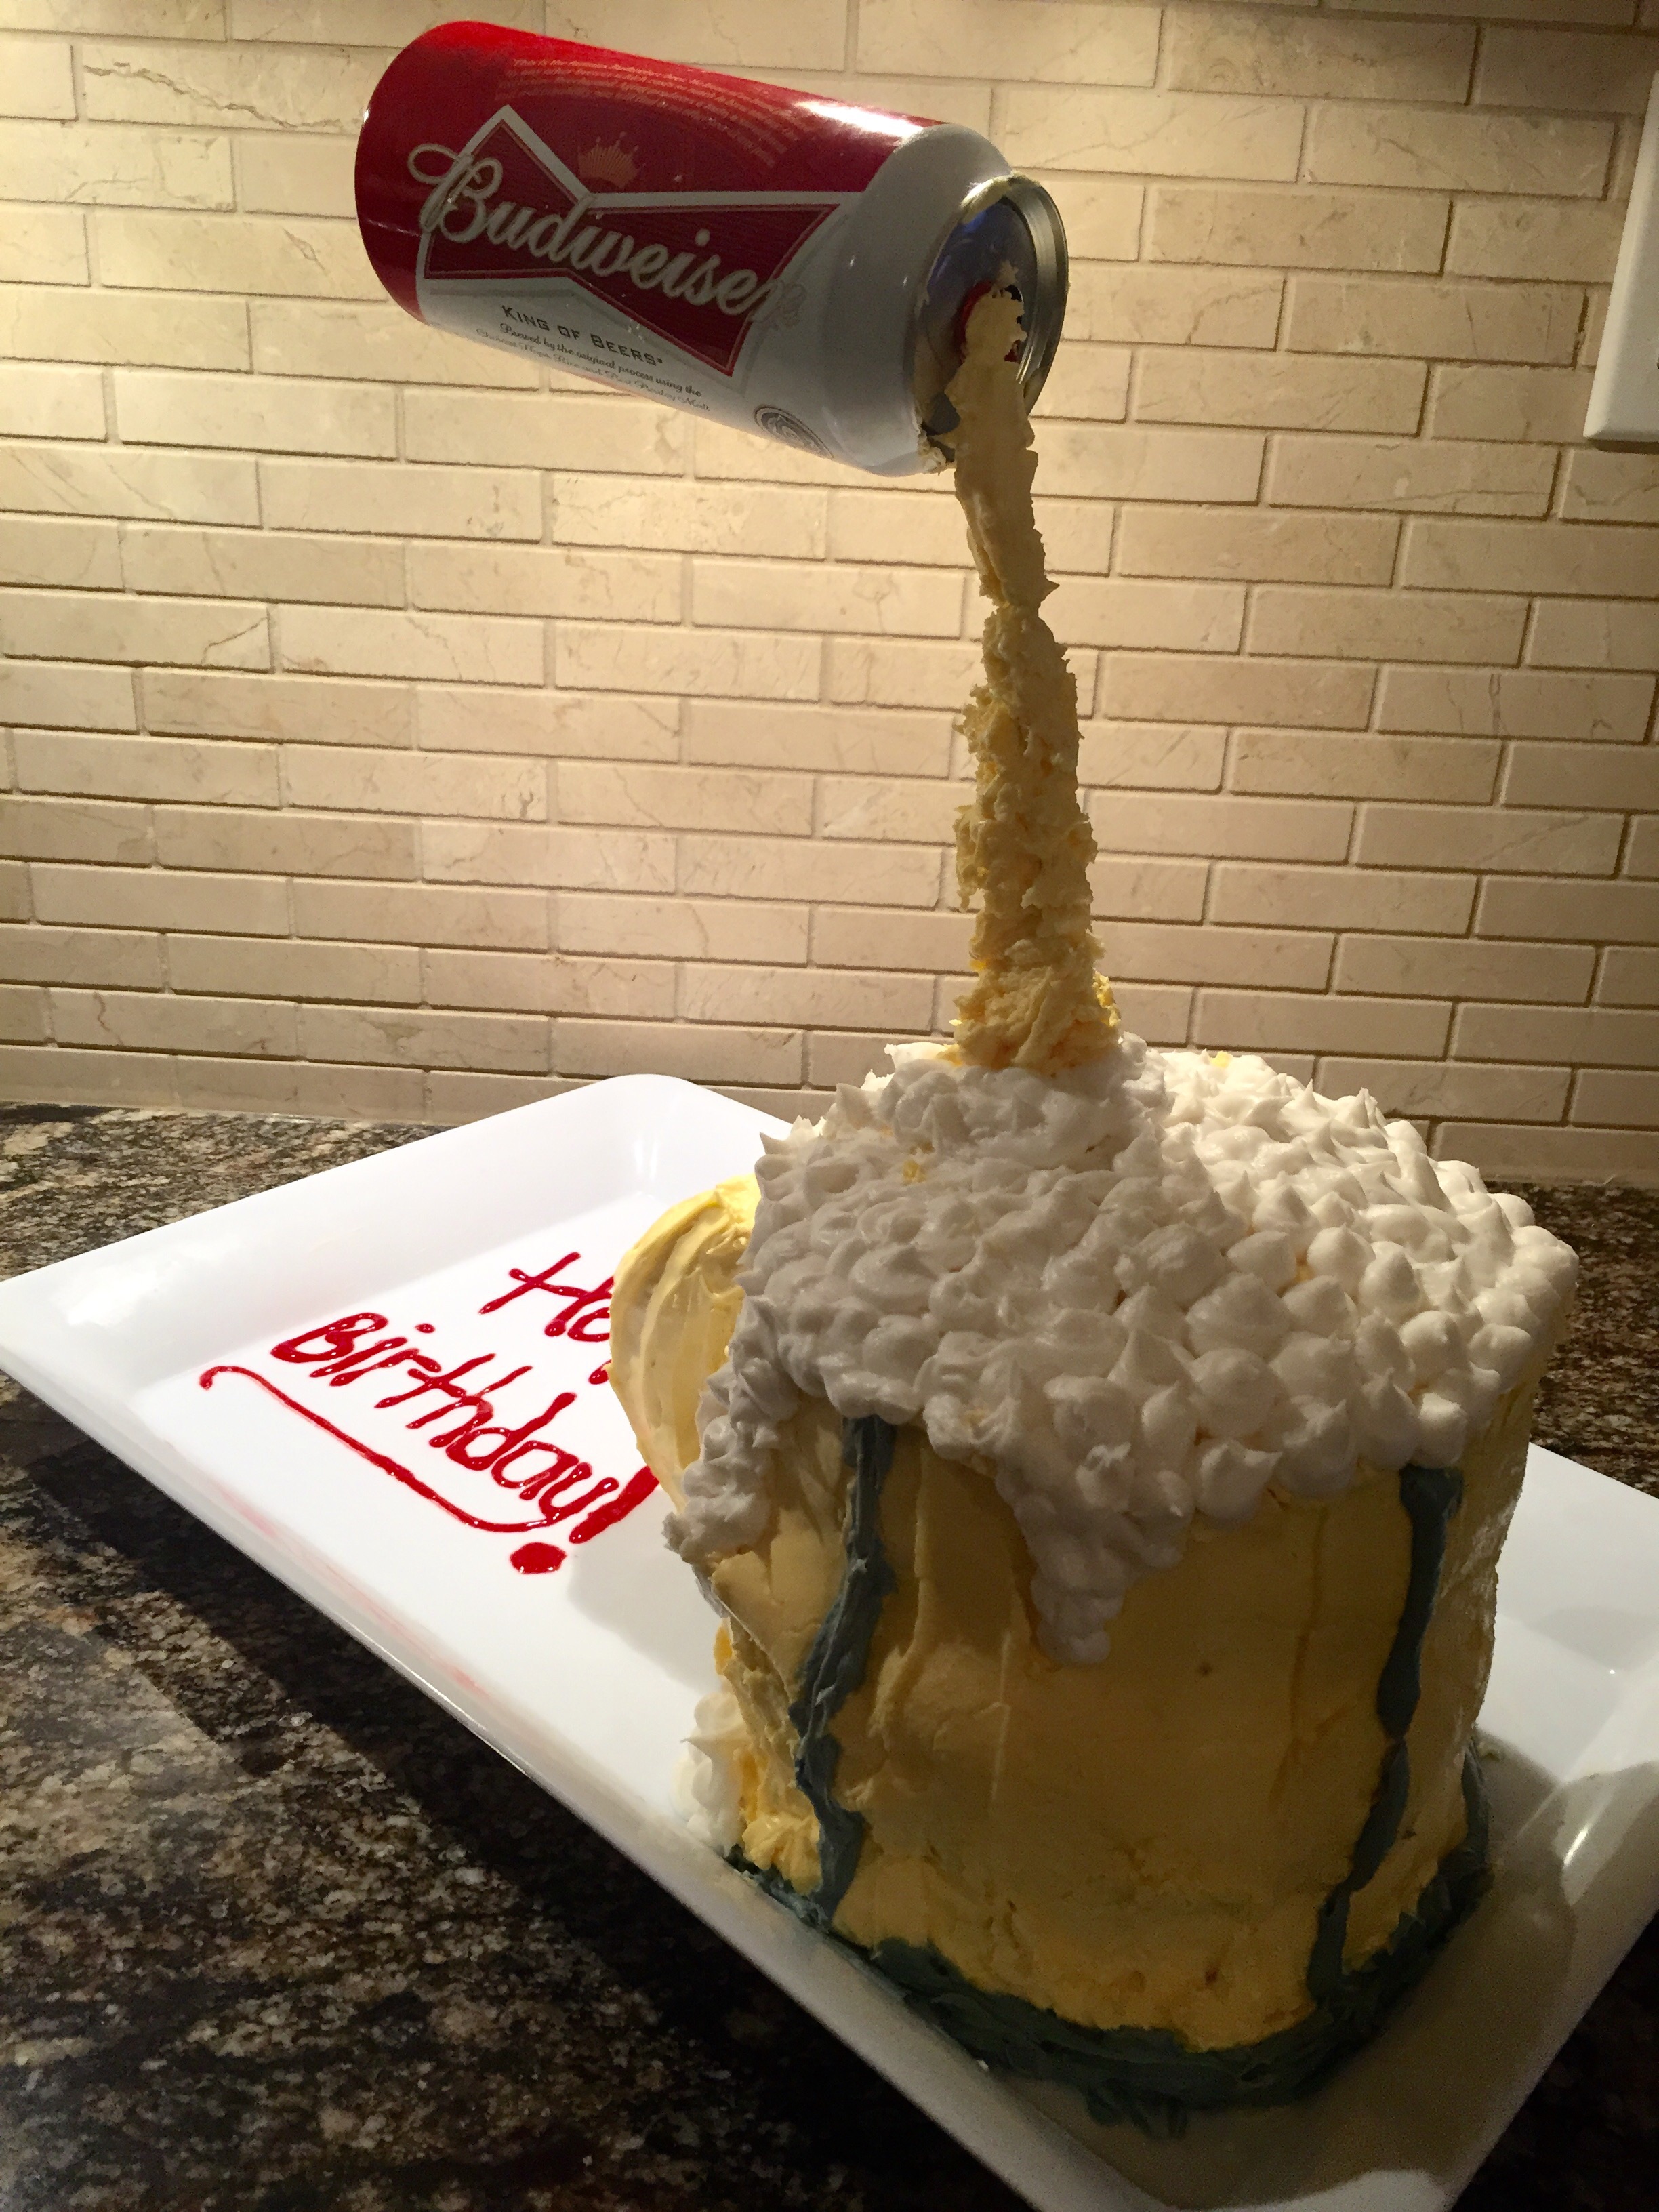
- To make the “head” of the beer I used white frosting in a pastry bag with a coupler and a large round Wilton tip. This is where you don’t have to worry about it being perfect and actually the messier you are here the better affect you get! I ended up bringing some of the foam down the mug and onto my platter to add the affect of beer foaming out of its glass.
- Next I stuck my balloon holder with flower wire right into the cake and then into the beer can. To help reinforce I turned the pop-tab on the top of the can so it was covering the hole in the can and this helped it hold really well!
- I then iced the ballon holder with the same colour icing I used for the mug. Again, the messier you can be here the better result you will get! I had to keep repeating this step a couple of times until the icing hardened. I added some of this icing right up into the mouth of the can to make it look like it was coming out of it.
- I moulded the rice krispies into a handle shape and covered this in the icing that I used for the mug. Using large toothpicks or skewers is best for holding them in place in the cake
- Lastly I piped on some grey lines using the same round Wilton tip and some red icing to write Happy Birthday on my platter. This is where you can get creative and add a label to your mug and personalize it however you like!


THAT’S IT! It may seem like a lot of steps but once you get going it’s really not too bad! Now that I know exactly how to make it, I know the next time I make it it will go even more smoothly! I PROMISE you that everyone will love this cake and you WILL get lots of questions about the illusion of the floating can (it’s AWESOME!)